French Toast Sticks
French toast sticks are a delightful twist on the classic breakfast dish, offering all the comforting flavors of traditional French toast while delivering a fun and dippable format. Perfect for busy mornings or lazy weekends, these sticks are sure to please both kids and adults alike. With a crispy exterior and a soft, custardy center, they’re an irresistible breakfast treat that can be customized with your favorite toppings. So, let’s dive into how to make these delicious French toast sticks with a wholesome twist!
The Upside of French Toast Sticks

French toast sticks are not just a breakfast; they are an experience! They bring back memories of childhood breakfasts while providing a canvas for creativity. You can dip them in maple syrup, sprinkle them with powdered sugar, or serve them alongside fresh berries for a refreshing touch. The best part? They are easy to make and can be prepared ahead of time. Plus, using whole wheat or Texas toast adds a hearty element, making them a satisfying start to your day.
Ingredient Checklist
To whip up a batch of these scrumptious French toast sticks, here’s what you’ll need:
- 8 slices thick-cut 3/4- to 1-inch whole wheat bread or Texas toast
- 1 cup granulated sugar
- 2 teaspoons ground cinnamon, divided
- 4 large eggs
- 1 cup milk (I used 2%; use whole milk for a richer flavor)
- 1 tablespoon pure maple syrup
- 1 teaspoon vanilla extract
- 1 teaspoon grated orange zest or lemon zest (optional)
- 1/2 teaspoon kosher salt
- Maple syrup and powdered sugar for serving
- Fresh berries for serving
- Nonstick cooking spray
Tools of the Trade
To make your French toast sticks, gather the following tools:
- Large Mixing Bowl: For whisking together the egg mixture.
- Whisk: To combine the ingredients smoothly.
- Sharp Knife: For cutting the bread into sticks.
- Skillet or Griddle: To cook the French toast sticks evenly.
- Spatula: For flipping the sticks without breaking them.
Cooking French Toast Sticks: The Process
Now, let’s get cooking! Follow these simple steps to create your delicious French toast sticks.
Step 1: Prepare the Bread
Start by cutting your thick-cut whole wheat or Texas toast into strips. Aim for about 1-inch wide, so they are easy to dip and cook evenly.
Step 2: Whisk the Egg Mixture
In a large mixing bowl, whisk together the eggs, milk, granulated sugar, 1 teaspoon of ground cinnamon, maple syrup, vanilla extract, zest (if using), and kosher salt. Make sure everything is well combined and frothy.
Step 3: Soak the Bread
Dip each piece of bread into the egg mixture, allowing it to soak for a few seconds on each side. Make sure they are well-coated but not overly soggy.
Step 4: Heat the Skillet
Preheat a skillet or griddle over medium heat and lightly spray with nonstick cooking spray.
Step 5: Cook the Sticks
Place the soaked bread sticks on the skillet, ensuring they are not overcrowded. Cook for about 2-3 minutes on each side, or until they are golden brown and slightly crispy.
Step 6: Sprinkle with Cinnamon Sugar
Once cooked, remove the sticks from the skillet and immediately sprinkle them with the remaining 1 teaspoon of ground cinnamon mixed with a bit of sugar for extra sweetness.
Step 7: Serve and Enjoy!
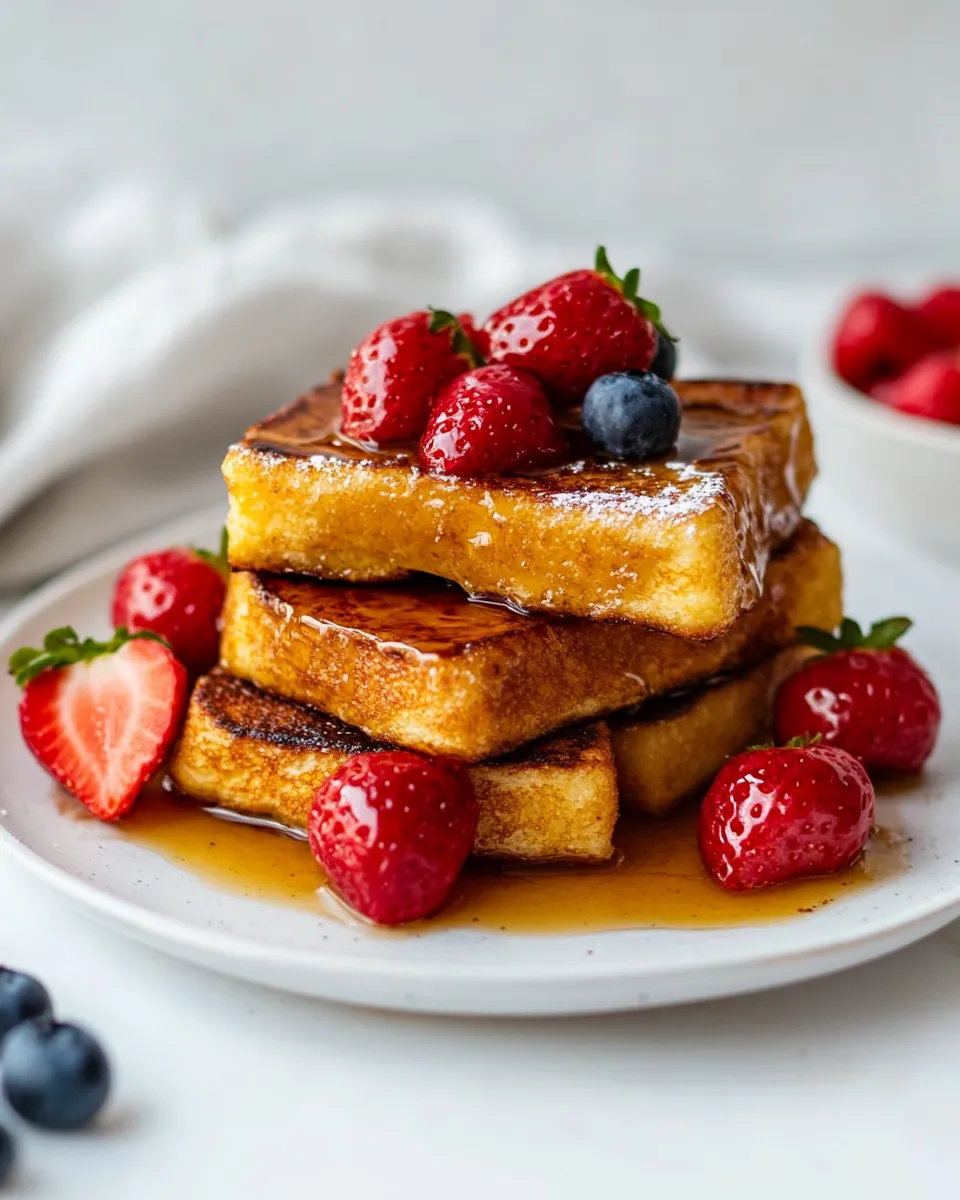
Serve your French toast sticks warm with maple syrup, powdered sugar, and fresh berries. These sticks are perfect for dipping and sharing.
Spring to Winter: Ideas
Elevate your French toast sticks throughout the year by incorporating seasonal flavors and toppings. Here are some ideas:
- Spring: Add fresh strawberries and mint leaves for a refreshing spring twist.
- Summer: Serve with a side of peach compote and whipped cream.
- Fall: Top with caramelized apples and a sprinkle of nutmeg.
- Winter: Pair with spiced cranberry sauce and a dollop of yogurt.
Don’t Do This
When making your French toast sticks, avoid these common pitfalls:
- Don’t let the bread soak too long; otherwise, they may become too soggy to cook properly.
- Don’t overcrowd the skillet; this can steam the bread instead of giving it a nice crisp.
- Don’t skip the cinnamon sugar sprinkle—it’s the finishing touch that elevates the flavor!
Refrigerate, Freeze, Reheat
If you’ve made a batch of French toast sticks and want to save some for later, here’s how to store and reheat them:
- Refrigerate: Store leftover French toast sticks in an airtight container in the fridge for up to 3 days.
- Freeze: For longer storage, freeze the cooked sticks in a single layer on a baking sheet, then transfer to a freezer bag. They can be frozen for up to 2 months.
- Reheat: To reheat, pop them in the toaster or oven at 350°F for about 10 minutes, or until heated through and crispy again.
Your Top Questions
Can I use different types of bread for French toast sticks?
Absolutely! While whole wheat and Texas toast work wonderfully, you can experiment with brioche, challah, or even gluten-free bread for a different flavor and texture.
How can I make these French toast sticks healthier?
To make a healthier version, you can reduce the amount of sugar, use almond or oat milk, and add protein powder to the egg mixture for an extra boost.
What toppings pair best with French toast sticks?
Some of the best toppings include fresh fruit, nut butter, yogurt, and a drizzle of maple syrup. You can also get creative with chocolate chips or flavored whipped cream!
Can I prepare the egg mixture ahead of time?
Yes, you can prepare the egg mixture the night before and store it in the refrigerator. Just give it a quick whisk before using it to make your French toast sticks.
Similar Recipes
If you enjoyed these French toast sticks, you might also love:
The Last Word
French toast sticks are a playful and delicious way to enjoy a classic breakfast favorite. They’re versatile, easy to make, and perfect for dipping! With a few simple ingredients and a bit of creativity, you can whip up a batch that will surely delight everyone at your breakfast table. Whether you’re serving them for a special occasion or a simple weekday morning, they are bound to bring smiles and satisfaction. Enjoy your homemade French toast sticks and happy cooking!

French Toast Sticks
Ingredients
Equipment
Method
- Step 1: Prepare the Bread - Cut the bread into strips about 1-inch wide.
- Step 2: Whisk the Egg Mixture - In a large bowl, whisk together eggs, milk, sugar, 1 teaspoon cinnamon, maple syrup, vanilla, zest, and salt.
- Step 3: Soak the Bread - Dip bread strips into the egg mixture, coating them well but not soggy.
- Step 4: Heat the Skillet - Preheat a skillet over medium heat and spray with nonstick cooking spray.
- Step 5: Cook the Sticks - Cook soaked bread sticks for 2-3 minutes on each side until golden brown.
- Step 6: Sprinkle with Cinnamon Sugar - Remove from skillet and sprinkle with remaining cinnamon and sugar.
- Step 7: Serve and Enjoy! - Serve warm with maple syrup, powdered sugar, and fresh berries.
Notes
- For variety, try different bread types like brioche or gluten-free.
- Make ahead by preparing the egg mixture the night before.
- Store leftovers in an airtight container for up to 3 days.