7 Layer Dip Cups
When it comes to party appetizers, few things can compete with the classic 7 Layer Dip. It’s a crowd-pleaser, bursting with flavors that blend together beautifully. But let’s take it a step further and turn this beloved dip into individual servings. Enter the 7 Layer Dip Cups! Perfect for game days, casual get-togethers, or anytime you crave a delicious snack, these cups are not only easy to assemble but also fun to eat. Each layer offers a delightful combination of textures and tastes that everyone will love. Let’s dive into how to create these colorful, flavor-packed cups that are sure to impress your guests.
Why It Deserves a Spot
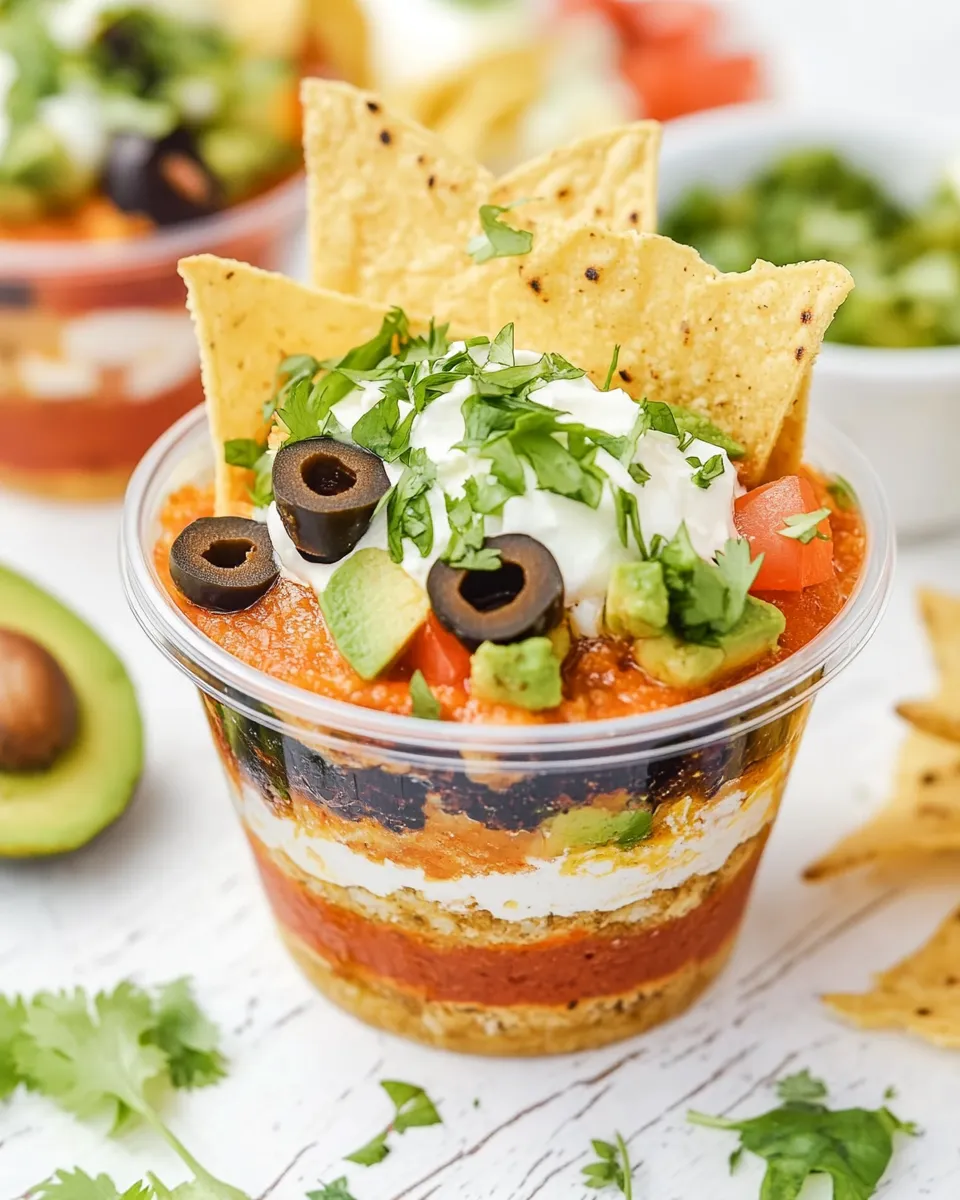
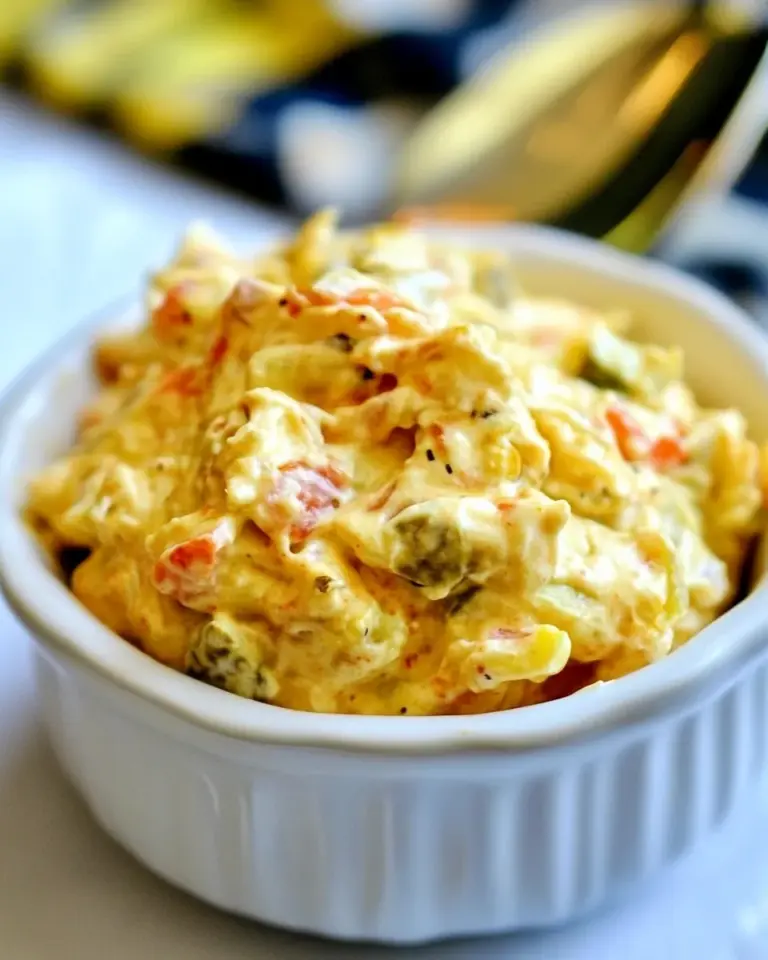
The beauty of 7 Layer Dip Cups lies in their versatility and convenience. No more worrying about double-dipping or messy plates. Each cup is a self-contained explosion of flavor, making them ideal for any gathering. The layers create a delightful visual appeal, showcasing vibrant colors from the fresh ingredients, while the combination of creamy, spicy, and savory elements keeps your taste buds dancing. Plus, they are incredibly easy to customize! Whether you’re a fan of extra spice, guacamole, or olives, you can easily adjust the layers to suit your preferences.
Your Shopping Guide
To create the perfect 7 Layer Dip Cups, you’ll need the following ingredients:
- 16 oz. refried beans – 1 can, for a hearty base.
- 1 oz. taco seasoning – 1 packet, for that signature flavor kick.
- 2-4 tbsp heavy cream – to achieve the desired creaminess.
- 8 oz. Fiesta blend shredded cheese – 1 bag, divided for layering.
- 16 oz. guacamole – 1 container, to add a rich and creamy layer.
- 16 oz. sour cream – 1 large tub, or you can swap it for plain Greek yogurt.
- 1 cup chunky salsa – for a fresh and zesty touch.
- 2.25 oz. sliced black olives – 1 small can, rinse if oil-packed.
- 1 cup cherry tomatoes – quartered, for a burst of freshness.
- 3 tbsp chopped fresh cilantro – or parsley, for a herbaceous finish.
- Tortilla chips – for serving and scooping.
Cook’s Kit
Make sure you have the following kitchen tools ready:
- Mixing bowls – for combining ingredients.
- Measuring cups and spoons – to ensure accurate quantities.
- Spatula or spoon – for layering the ingredients neatly.
- Clear cups or small jars – to showcase the beautiful layers.
- Knife and cutting board – for chopping tomatoes and herbs.
- Can opener – if you’re using canned ingredients.
7 Layer Dip Cups in Steps
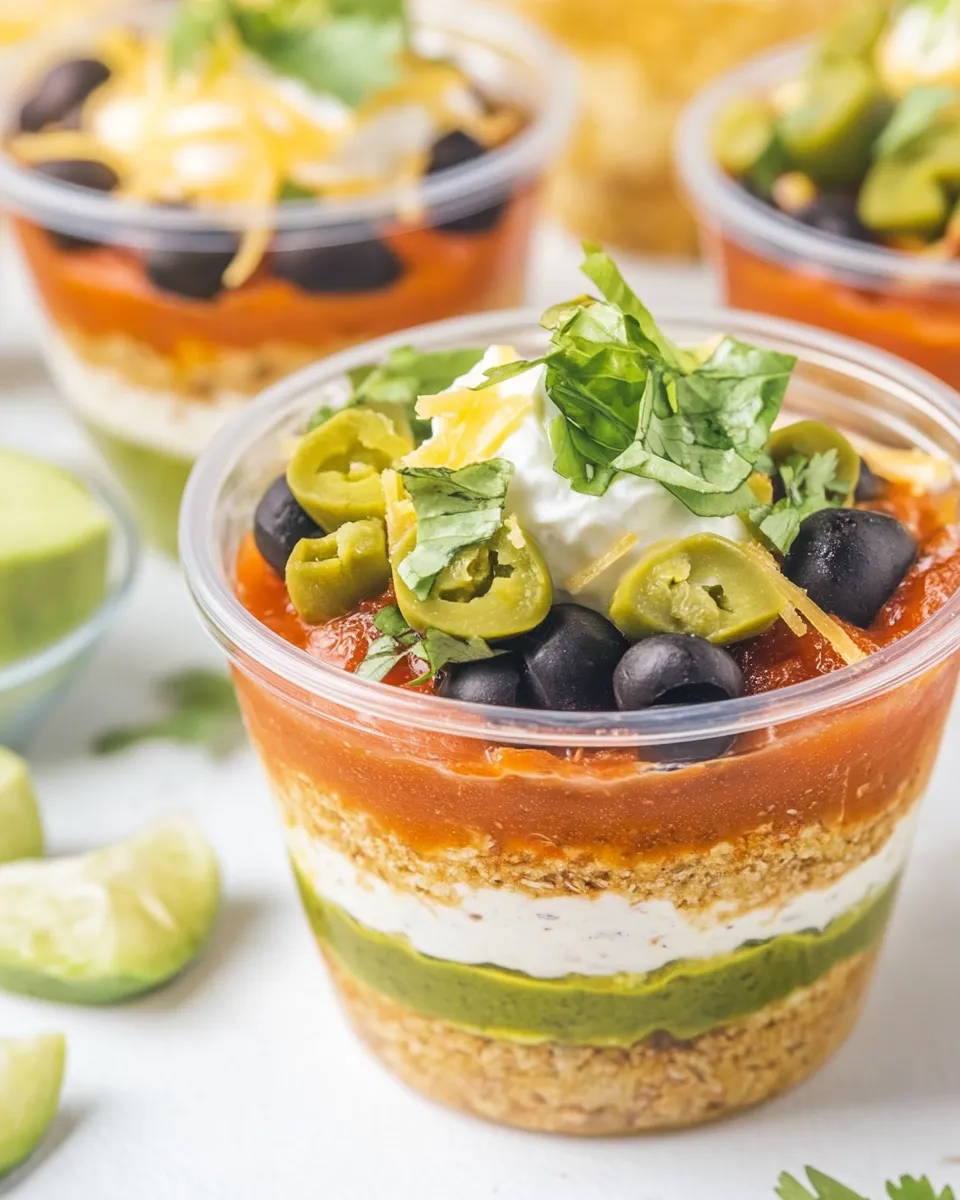
Step 1: Prepare the Refried Bean Base
Start by mixing the refried beans with the taco seasoning in a bowl. Add 2 to 4 tablespoons of heavy cream to achieve a smooth consistency. This will be the flavorful foundation of your dip cups.
Step 2: Layer the Beans
Spoon a generous layer of the seasoned refried beans into the bottom of each clear cup. This is your first layer, and it sets the stage for the rest.
Step 3: Add the Cheese
Sprinkle about half of the Fiesta blend shredded cheese over the beans. This cheesy layer adds richness and helps bind the flavors together.
Step 4: Guacamole Time
Next, add a layer of guacamole. Use a spoon to spread it evenly over the cheese, creating a creamy, delicious layer.
Step 5: Sour Cream Layer
Spoon the sour cream (or Greek yogurt) over the guacamole. This layer adds a tangy contrast to the creamy avocado.
Step 6: Salsa Splash
Pour a layer of chunky salsa over the sour cream. This will add freshness and a pop of color to your cups.
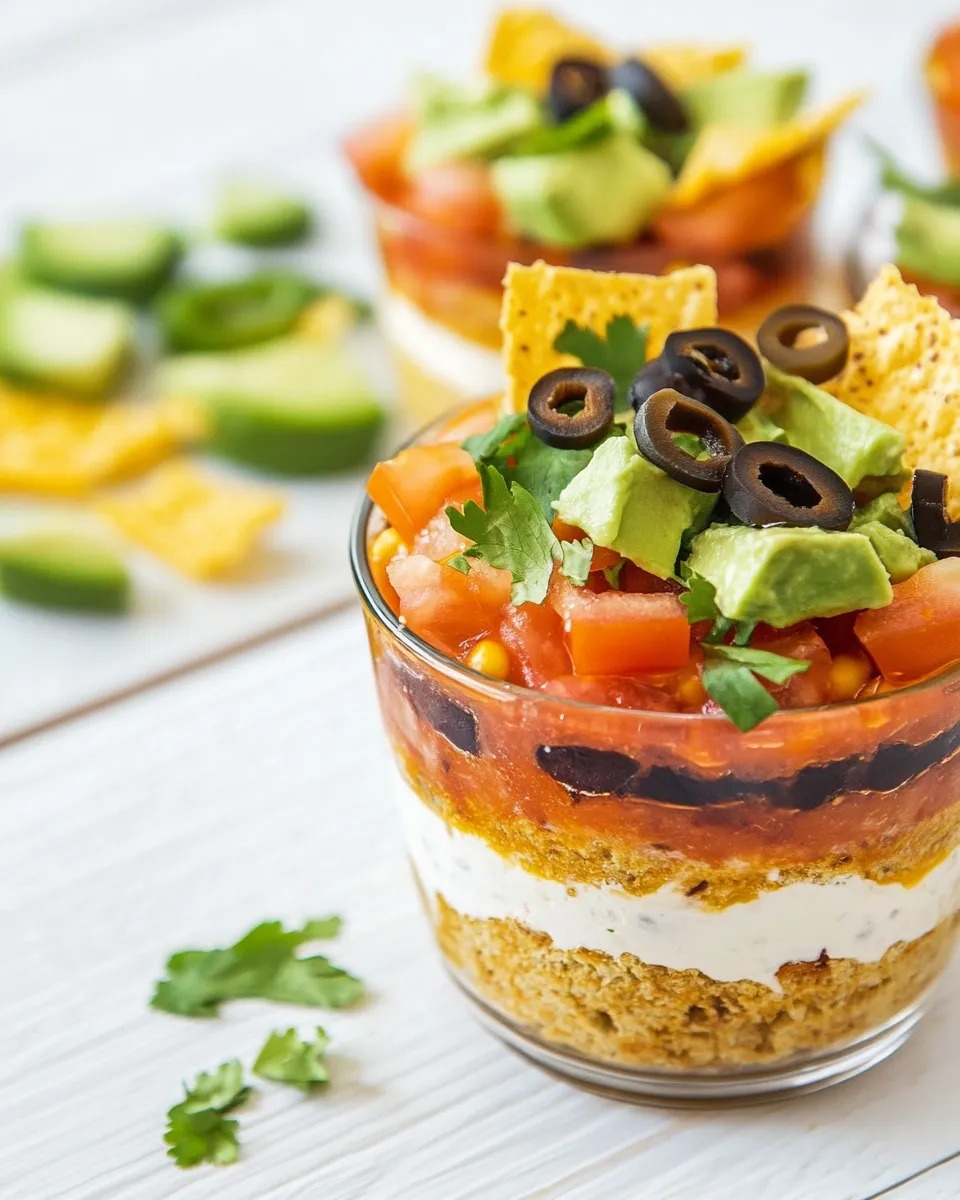
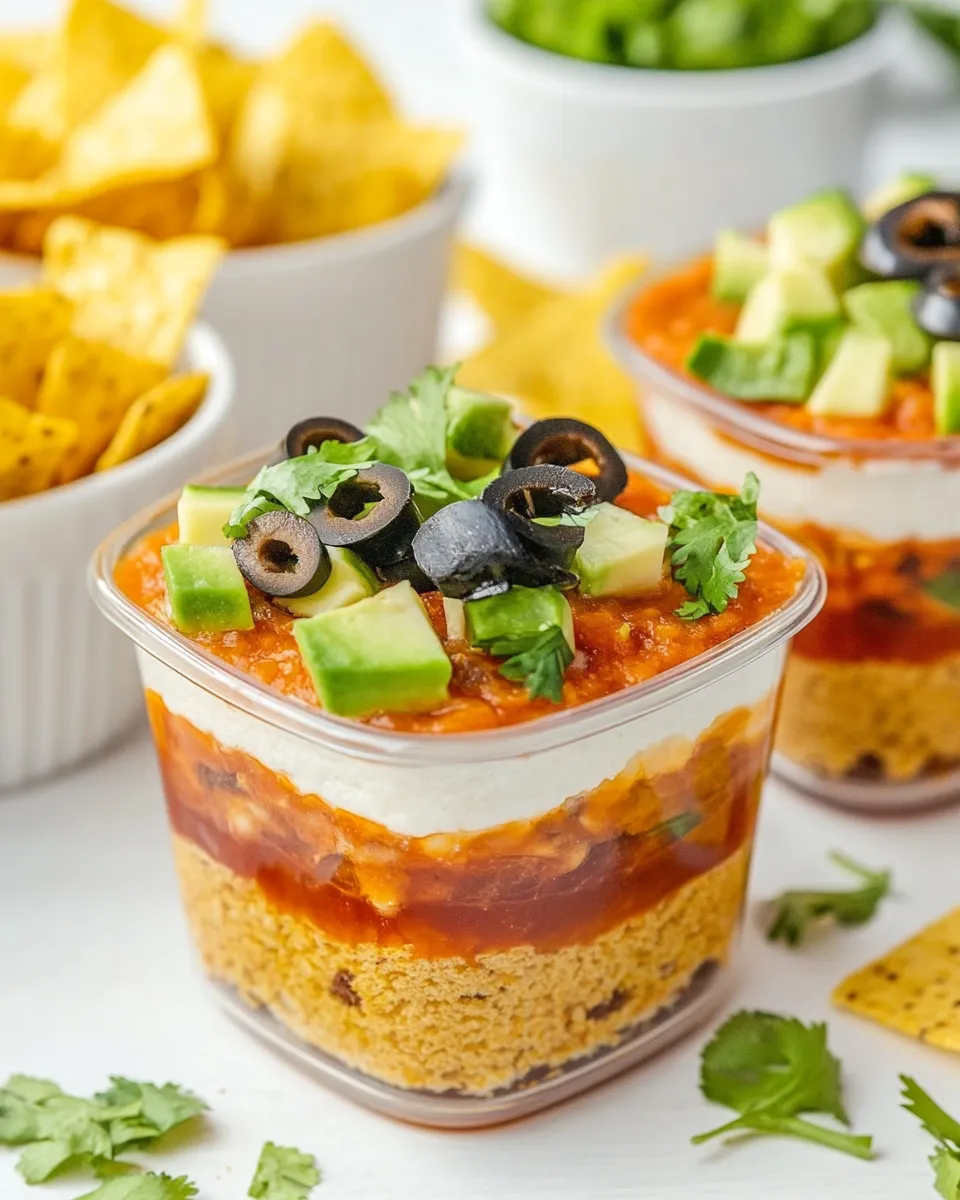
Step 7: Finish with Toppings
Top your dip cups with sliced black olives, quartered cherry tomatoes, and a sprinkle of chopped cilantro. These final touches enhance the flavor and presentation.
Dairy-Free/Gluten-Free Swaps
If you need to make your 7 Layer Dip Cups dairy-free or gluten-free, consider these swaps:
- Refried Beans: Ensure they are gluten-free by checking the label.
- Heavy Cream: Substitute with coconut cream or a dairy-free sour cream alternative.
- Cheese: Use dairy-free shredded cheese for a similar texture.
- Sour Cream: Opt for a plant-based yogurt or sour cream alternative.
- Tortilla Chips: Look for gluten-free tortilla chips to serve.
Things That Go Wrong
While assembling your dip cups is straightforward, here are some common pitfalls to avoid:
- Not mixing the refried beans well with the taco seasoning, leading to uneven flavor.
- Overloading cups with too much of one ingredient, which can make them messy and hard to eat.
- Forgetting to rinse oil-packed olives, which can add an unwanted oily taste.
- Using overly ripe or mushy tomatoes that can make the dip watery.
Best Ways to Store
If you have leftovers or plan to make these ahead of time, here’s how to store your 7 Layer Dip Cups:
- Cover the cups tightly with plastic wrap or a lid to maintain freshness.
- Store in the refrigerator for up to 2 days, but note that the texture may change slightly.
- Keep the tortilla chips separate until you’re ready to serve to maintain their crunch.
Quick Questions
Can I make these cups in advance?
Yes! You can prepare the layers ahead of time and assemble the cups just before serving to keep everything fresh.
What can I use instead of sour cream?
You can substitute sour cream with plain Greek yogurt or a dairy-free alternative like cashew cream.
Can I freeze 7 Layer Dip Cups?
It’s not recommended to freeze these cups, as the texture of the ingredients will change upon thawing.
What’s the best way to serve these cups?
Serve them chilled with a side of tortilla chips for dipping. The individual portions make it easy for guests to grab and enjoy!
Healthy-ish Favorites
If you’re looking for more healthy-ish recipes to complement your 7 Layer Dip Cups, check out these favorites:
- Healthy Vegetable Dip – A lighter take on dips that pairs well with veggies.
- Healthy Sweet Potato Chips – Crunchy and nutritious, perfect for scooping.
- Easy Vegan Chili – A hearty dish to enjoy alongside your dip cups.
- Healthy Chocolate Chip Cookies – Because dessert is essential too!
Bring It Home
Now that you have all the ingredients and steps laid out, it’s time to gather your friends and family for a fun get-together or a cozy night in. The 7 Layer Dip Cups are not just delicious but also a feast for the eyes, making them perfect for any occasion. With their vibrant layers and delectable flavors, these cups will quickly become a favorite at your gatherings. So, get ready to dig in and savor every bite of these delightful creations. Your taste buds will thank you!
7 Layer Dip Cups
Ingredients
Equipment
Method
- Start by mixing the refried beans with the taco seasoning in a bowl. Add 2 to 4 tablespoons of heavy cream to achieve a smooth consistency. This will be the flavorful foundation of your dip cups.
- Spoon a generous layer of the seasoned refried beans into the bottom of each clear cup. This is your first layer, and it sets the stage for the rest.
- Sprinkle about half of the Fiesta blend shredded cheese over the beans. This cheesy layer adds richness and helps bind the flavors together.
- Next, add a layer of guacamole. Use a spoon to spread it evenly over the cheese, creating a creamy, delicious layer.
- Spoon the sour cream (or Greek yogurt) over the guacamole. This layer adds a tangy contrast to the creamy avocado.
- Pour a layer of chunky salsa over the sour cream. This will add freshness and a pop of color to your cups.
- Top your dip cups with sliced black olives, quartered cherry tomatoes, and a sprinkle of chopped cilantro. These final touches enhance the flavor and presentation.
Notes
- Customize the layers to suit your taste preferences.
- Prepare the layers ahead of time and assemble just before serving for freshness.
- Keep tortilla chips separate until serving to maintain their crunch.