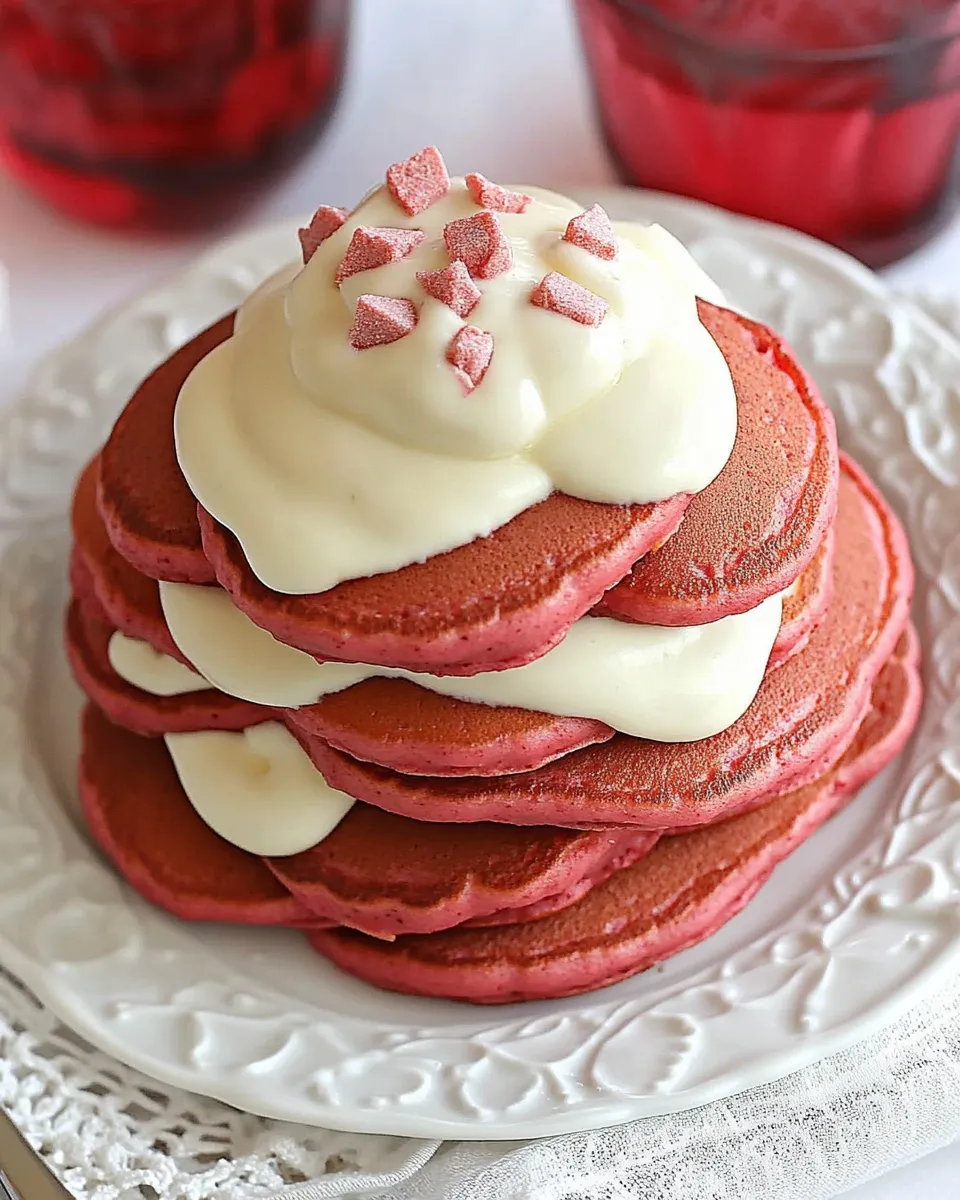
Red Velvet Pancakes with Cream Cheese Topping
When it comes to breakfast, few things can brighten your morning like a stack of vibrant Red Velvet Pancakes with Cream Cheese Topping. These fluffy pancakes bring a touch of elegance and indulgence to your table, making them perfect for special occasions or a delightful weekend treat. With their rich color and luscious cream cheese topping, they’re sure to impress family and friends alike. Plus, they are lightened up using lower-fat ingredients, so you can enjoy this classic flavor without the guilt. Let’s dive into this delicious recipe that will have you flipping pancakes like a pro!
Why It’s My Go-To

Red Velvet Pancakes with Cream Cheese Topping have become my go-to breakfast for several reasons. First, they are visually stunning, making them an ideal choice for brunch gatherings or special celebrations. Second, the combination of flavors—cocoa, vanilla, and cream cheese—creates a delightful taste experience that’s both rich and satisfying. Lastly, they are surprisingly easy to whip up, so you can enjoy a gourmet breakfast without spending hours in the kitchen. Trust me, once you try these pancakes, they’ll become your new favorite!
What Goes In
- 2 oz 1/3 less fat cream cheese (recommended: Philadelphia)
- 3 tbsp plain fat-free yogurt
- 3 tbsp honey
- 1 tbsp fat-free milk
- 1/2 cup white whole wheat flour
- 1/2 cup unbleached all-purpose flour
- 2 1/4 tsp baking powder
- 1/2 tbsp unsweetened cocoa powder
- 1/4 tsp salt
- 1/4 cup raw sugar (or Splenda or Stevia)
- 1 large egg
- 1 cup + 2 tbsp fat-free milk
- 1 tsp vanilla extract
- 1/2 tsp red paste food coloring (I used Wilton no-taste paste)
- Cooking spray for the pan
Equipment & Tools
- Mixing bowls – For combining wet and dry ingredients.
- Whisk – To mix the batter smoothly.
- Measuring cups and spoons – For accurate ingredient measurements.
- Spatula – For flipping the pancakes.
- Skillet or griddle – To cook the pancakes evenly.
Red Velvet Pancakes with Cream Cheese Topping in Steps

Step 1: Prepare the Cream Cheese Topping
In a medium bowl, beat together the cream cheese, plain yogurt, honey, and fat-free milk until smooth and creamy. Set this delightful mixture aside while you work on the pancakes.
Step 2: Mix the Dry Ingredients
In a large mixing bowl, whisk together the white whole wheat flour, unbleached all-purpose flour, baking powder, unsweetened cocoa powder, salt, and raw sugar until well combined.
Step 3: Combine the Wet Ingredients
In another bowl, whisk together the egg, fat-free milk, vanilla extract, and red paste food coloring until blended.
Step 4: Create the Pancake Batter
Pour the wet ingredients into the dry ingredient mixture. Stir gently until just combined; be careful not to overmix, as this can lead to tough pancakes. The batter should be slightly lumpy.
Step 5: Preheat the Skillet
Heat a non-stick skillet or griddle over medium heat and lightly coat with cooking spray.
Step 6: Cook the Pancakes
Pour about 1/4 cup of pancake batter onto the skillet for each pancake. Cook for 2-3 minutes or until small bubbles form on the surface. Flip and cook for another 1-2 minutes on the other side, until golden brown. Repeat with the remaining batter.
Step 7: Serve and Enjoy
Stack the pancakes on a plate and top with the prepared cream cheese topping. Drizzle with additional honey or maple syrup if desired. Serve warm and enjoy the delightful flavors!
Ingredient Swaps & Substitutions
- For the cream cheese, you can use any low-fat cream cheese brand.
- Replace honey with agave syrup or maple syrup for a different sweetness.
- Use almond milk or any plant-based milk instead of fat-free milk for a dairy-free option.
- For the flours, feel free to use gluten-free all-purpose flour for a gluten-free version.
Author’s Commentary
Creating Red Velvet Pancakes with Cream Cheese Topping is a labor of love that pays off with each bite. The rich, velvety flavor combined with the tangy cream cheese topping creates a perfect harmony that’s hard to resist. Not only are these pancakes visually stunning, but they also bring a gourmet touch to your breakfast table. They are versatile enough to be enjoyed on any day, yet special enough for celebrations. Make sure to savor each bite and share with loved ones—they’re truly a treat!
Storage Pro Tips
- Leftover pancakes can be stored in an airtight container in the refrigerator for up to 3 days.
- For longer storage, freeze the pancakes in a single layer on a baking sheet, then transfer them to a freezer bag. They will keep for up to 2 months.
- To reheat, simply microwave for about 30 seconds or warm them in a toaster oven.
Common Questions
Can I make these pancakes ahead of time?
Absolutely! You can prepare the batter the night before and store it in the refrigerator. Just give it a good stir before cooking. Alternatively, you can make the pancakes and store them in the fridge or freezer for later enjoyment.
What can I use instead of red food coloring?
You can substitute red food coloring with beet juice or pomegranate juice for a natural alternative. Keep in mind this may slightly alter the flavor and color.
Are these pancakes suitable for meal prep?
Yes! These pancakes are perfect for meal prep. Just make a big batch on the weekend, and you’ll have delicious breakfasts ready to go for the week!
Can I add mix-ins to the batter?
Definitely! Feel free to add chocolate chips, nuts, or even berries to the pancake batter for added flavor and texture.
Cook This Next
- Fluffy Banana Pancakes
- Blueberry Oatmeal Pancakes
- Chocolate Chip Protein Pancakes
- Cinnamon Roll Pancakes
Ready, Set, Cook
These Red Velvet Pancakes with Cream Cheese Topping are just waiting to be made in your kitchen. With their delightful flavors and beautiful presentation, you’ll be sure to create a memorable breakfast experience. Gather your ingredients, follow the steps, and treat yourself and your loved ones to a luxurious pancake feast. Happy cooking, and enjoy every delicious bite!

Red Velvet Pancakes with Cream Cheese Topping
Ingredients
Equipment
Method
- Step 1: Prepare the Cream Cheese Topping: In a medium bowl, beat together the cream cheese, plain yogurt, honey, and fat-free milk until smooth and creamy. Set this delightful mixture aside while you work on the pancakes.
- Step 2: Mix the Dry Ingredients: In a large mixing bowl, whisk together the white whole wheat flour, unbleached all-purpose flour, baking powder, unsweetened cocoa powder, salt, and raw sugar until well combined.
- Step 3: Combine the Wet Ingredients: In another bowl, whisk together the egg, fat-free milk, vanilla extract, and red paste food coloring until blended.
- Step 4: Create the Pancake Batter: Pour the wet ingredients into the dry ingredient mixture. Stir gently until just combined; be careful not to overmix, as this can lead to tough pancakes. The batter should be slightly lumpy.
- Step 5: Preheat the Skillet: Heat a non-stick skillet or griddle over medium heat and lightly coat with cooking spray.
- Step 6: Cook the Pancakes: Pour about 1/4 cup of pancake batter onto the skillet for each pancake. Cook for 2-3 minutes or until small bubbles form on the surface. Flip and cook for another 1-2 minutes on the other side, until golden brown. Repeat with the remaining batter.
- Step 7: Serve and Enjoy: Stack the pancakes on a plate and top with the prepared cream cheese topping. Drizzle with additional honey or maple syrup if desired. Serve warm and enjoy the delightful flavors!
Notes
- Leftover pancakes can be stored in an airtight container in the refrigerator for up to 3 days.
- For longer storage, freeze the pancakes in a single layer on a baking sheet, then transfer them to a freezer bag. They will keep for up to 2 months.
- To reheat, simply microwave for about 30 seconds or warm them in a toaster oven.