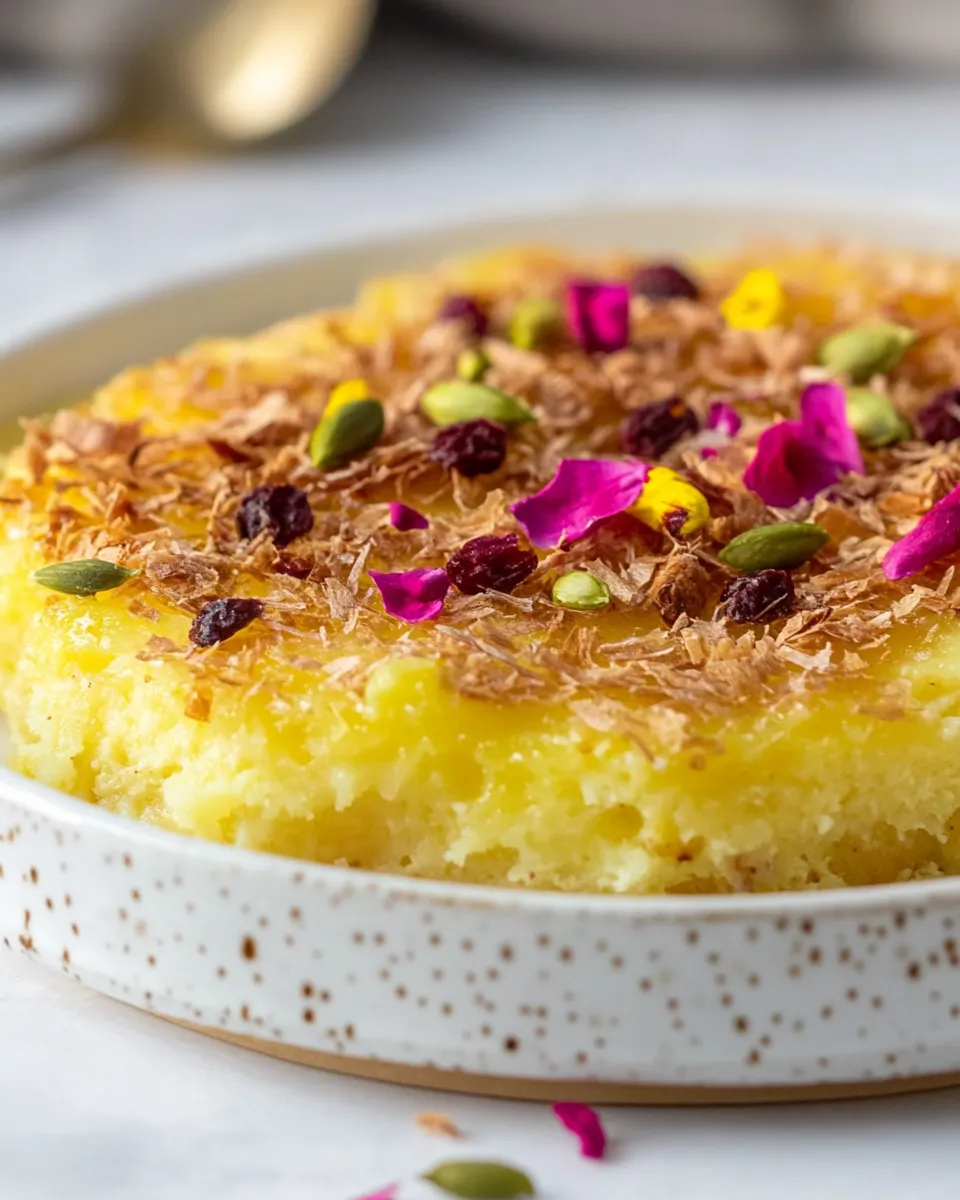
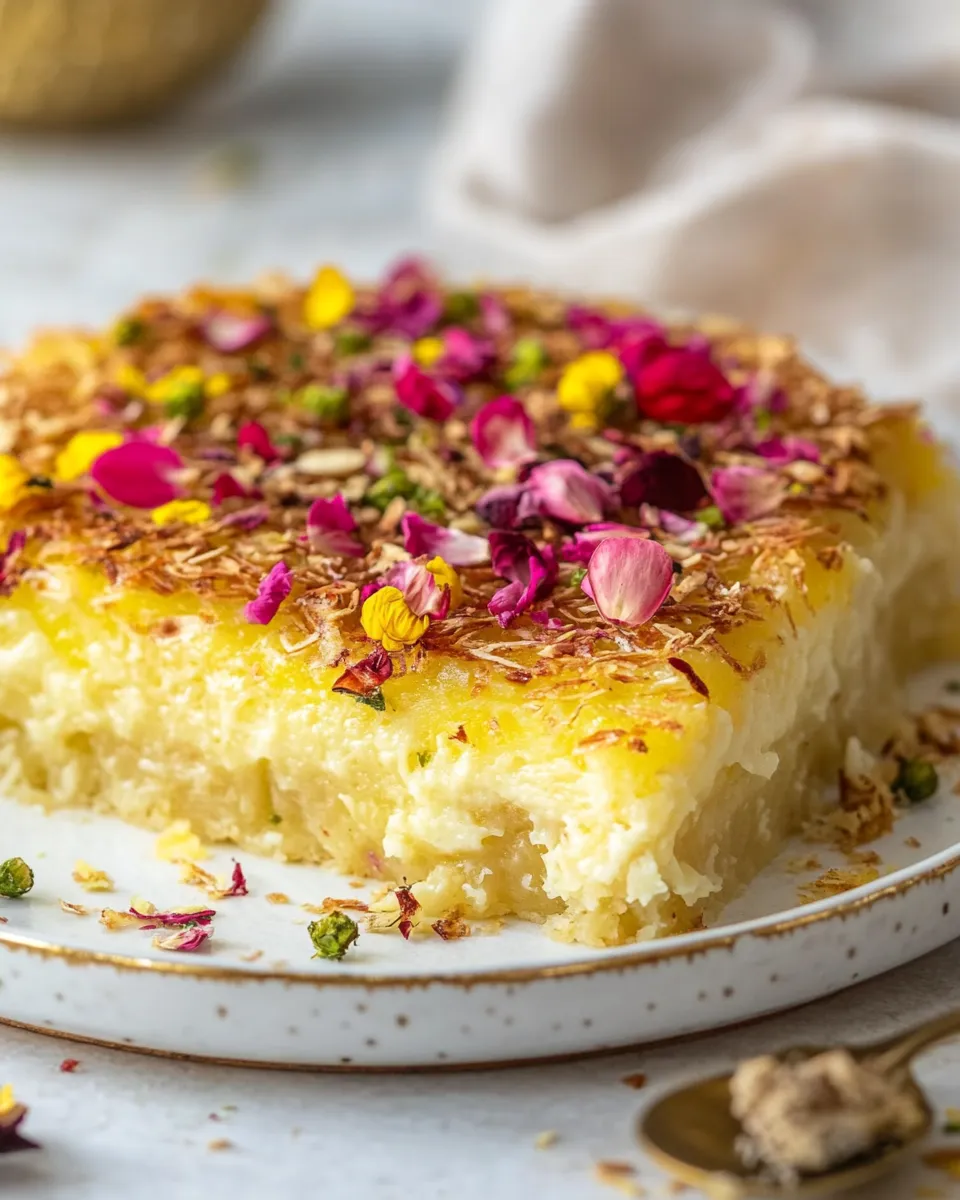
Knafeh
Knafeh is a beloved Middle Eastern dessert that has won hearts and taste buds around the world. With its delicate layers of shredded pastry, gooey cheese, and fragrant syrup, this dish is a perfect blend of textures and flavors. The golden, crispy top layer contrasts beautifully with the sweet, melted cheese underneath. Whether enjoyed at a special occasion or simply on a cozy evening at home, Knafeh is sure to impress. Today, we will explore how to create this delicious treat from scratch, diving into the traditional methods while also offering tips to ensure your Knafeh is nothing short of perfection.
What Sets This Recipe Apart

This Knafeh recipe stands out for its use of fresh, unsalted white cheese, which is crucial for achieving the right balance of sweetness and saltiness. The combination of kataifi dough and rich, melted cheese creates a unique texture that melts in your mouth. Additionally, the fragrance of rose water in the syrup elevates the flavor profile, making each bite unforgettable. This recipe balances tradition with simplicity, ensuring that anyone can recreate this Middle Eastern favorite in their own kitchen.
What You’ll Gather
To make a delightful Knafeh, you will need the following ingredients:
- 1 ½ cups granulated sugar
- 1 cup water
- 1 teaspoon rose water
- ½ pound kataifi dough, thawed (shredded phyllo dough)
- 8 tablespoons unsalted butter, melted
- 1 pound unsalted white sweet cheese, such as Nabulsi, Akkawi, or mozzarella, freshly shredded
- ⅓ cup crushed pistachios for garnish
Recommended Tools
To make the process smoother, gather the following tools:
- 9×13 inch baking dish: Ideal for layering your Knafeh.
- Mixing bowls: For combining your ingredients.
- Whisk: To mix the sugar syrup until fully dissolved.
- Sharp knife: To cut the Knafeh into perfect squares for serving.
- Pastry brush: For applying melted butter evenly over the kataifi dough.
Stepwise Method: Knafeh
Step 1: Prepare the Sugar Syrup
In a saucepan, combine the granulated sugar and water. Bring to a boil, then reduce the heat and let simmer for about 10 minutes until it thickens slightly. Remove from heat and stir in the rose water. Set aside to cool.
Step 2: Preheat the Oven
Preheat your oven to 350°F (175°C) while you prepare the Knafeh.
Step 3: Prepare the Kataifi Dough
In a large bowl, gently separate the kataifi dough with your fingers to ensure it’s fluffy. Pour the melted butter over the dough, mixing until evenly coated.
Step 4: Layer the Kataifi Dough
Spread half of the kataifi dough in the bottom of the prepared baking dish, pressing it down lightly. This will form the base of your Knafeh.
Step 5: Add the Cheese
Evenly distribute the freshly shredded cheese over the kataifi layer, ensuring it covers the entire surface.
Step 6: Top with Remaining Kataifi Dough
Spread the remaining kataifi dough over the cheese layer, pressing it down gently to create a compact top layer.
Step 7: Bake the Knafeh
Place the baking dish in the preheated oven and bake for approximately 30-35 minutes, or until the top is golden brown and crispy.
Step 8: Add the Sugar Syrup
Once baked, remove the Knafeh from the oven and immediately pour the cooled sugar syrup over the hot pastry. Allow it to soak for a few minutes.
Step 9: Garnish and Serve
Sprinkle the crushed pistachios on top for a pop of color and flavor. Cut into squares or diamond shapes, serve warm, and enjoy!
Dairy-Free/Gluten-Free Swaps

If you need to make this Knafeh recipe dairy-free or gluten-free, consider the following substitutions:
- Dairy-Free Cheese: Use a dairy-free cheese alternative that melts well, such as cashew or almond-based cheese.
- Gluten-Free Kataifi: Look for gluten-free shredded phyllo or a suitable alternative.
Mistakes Even Pros Make
Making Knafeh can seem straightforward, but even seasoned bakers can run into issues. Here are a few common mistakes to avoid:
- Not separating the kataifi dough properly can lead to uneven baking and a dense texture.
- Using too much or too little melted butter can affect the flavor and crispiness of the top layer.
- Pouring hot syrup over cold Knafeh can make the pastry soggy; always ensure the syrup is cooled before application.
- Not allowing the Knafeh to soak in the syrup long enough may result in a lack of sweetness throughout.
Storage Pro Tips
To keep your Knafeh fresh and delicious, consider these storage tips:
- Store any leftovers in an airtight container in the refrigerator for up to 3 days.
- Reheat in the oven for a few minutes to restore its crispy texture before serving.
- If you plan to make Knafeh in advance, prepare the components separately and assemble just before baking for optimal freshness.
Handy Q&A
Can I use a different type of cheese?
Absolutely! While Nabulsi and Akkawi are traditional, you can substitute with mozzarella or any other mild, stretchy cheese that melts well.
What if I can’t find kataifi dough?
If kataifi dough is unavailable, you can use shredded phyllo dough or even make a simple pastry crust as an alternative, though the texture will differ.
Can I freeze Knafeh?
Yes, you can freeze Knafeh before baking. Just wrap it tightly and store it in the freezer for up to a month. Bake from frozen, adding a few extra minutes to the cooking time.
Is Knafeh best served hot or cold?
Knafeh is best served warm, as the cheese is gooey and the pastry is crispy. However, it can still be enjoyed cold if you prefer!
Next Up in Your Queue
If Knafeh has whetted your appetite for more delectable Middle Eastern desserts, consider trying these:
- Baklava: A Sweet, Nutty Delight
- Mahalabia: Creamy Rose Water Pudding
- Basbousa: Sweet Semolina Cake
- Qatayef: Stuffed Pancakes for Dessert
Ready to Cook?
Now that you have everything you need to create your own delicious Knafeh, it’s time to roll up your sleeves and get cooking! This recipe is not just a treat for your taste buds, but also a way to connect with the rich culinary traditions of the Middle East. Whether you’re preparing it for a special occasion or a casual gathering, Knafeh is sure to be a showstopper that leaves everyone asking for seconds. Happy baking, and enjoy every gooey, crispy bite!
Knafeh
Ingredients
Equipment
Method
- In a saucepan, combine the granulated sugar and water. Bring to a boil, then reduce the heat and let simmer for about 10 minutes until it thickens slightly. Remove from heat and stir in the rose water. Set aside to cool.
- Preheat your oven to 350°F (175°C) while you prepare the Knafeh.
- In a large bowl, gently separate the kataifi dough with your fingers to ensure it’s fluffy. Pour the melted butter over the dough, mixing until evenly coated.
- Spread half of the kataifi dough in the bottom of the prepared baking dish, pressing it down lightly. This will form the base of your Knafeh.
- Evenly distribute the freshly shredded cheese over the kataifi layer, ensuring it covers the entire surface.
- Spread the remaining kataifi dough over the cheese layer, pressing it down gently to create a compact top layer.
- Place the baking dish in the preheated oven and bake for approximately 30-35 minutes, or until the top is golden brown and crispy.
- Once baked, remove the Knafeh from the oven and immediately pour the cooled sugar syrup over the hot pastry. Allow it to soak for a few minutes.
- Sprinkle the crushed pistachios on top for a pop of color and flavor. Cut into squares or diamond shapes, serve warm, and enjoy!
Notes
- Store leftovers in an airtight container in the refrigerator for up to 3 days.
- Reheat in the oven for a few minutes to restore its crispy texture before serving.
- If making in advance, prepare components separately and assemble just before baking.