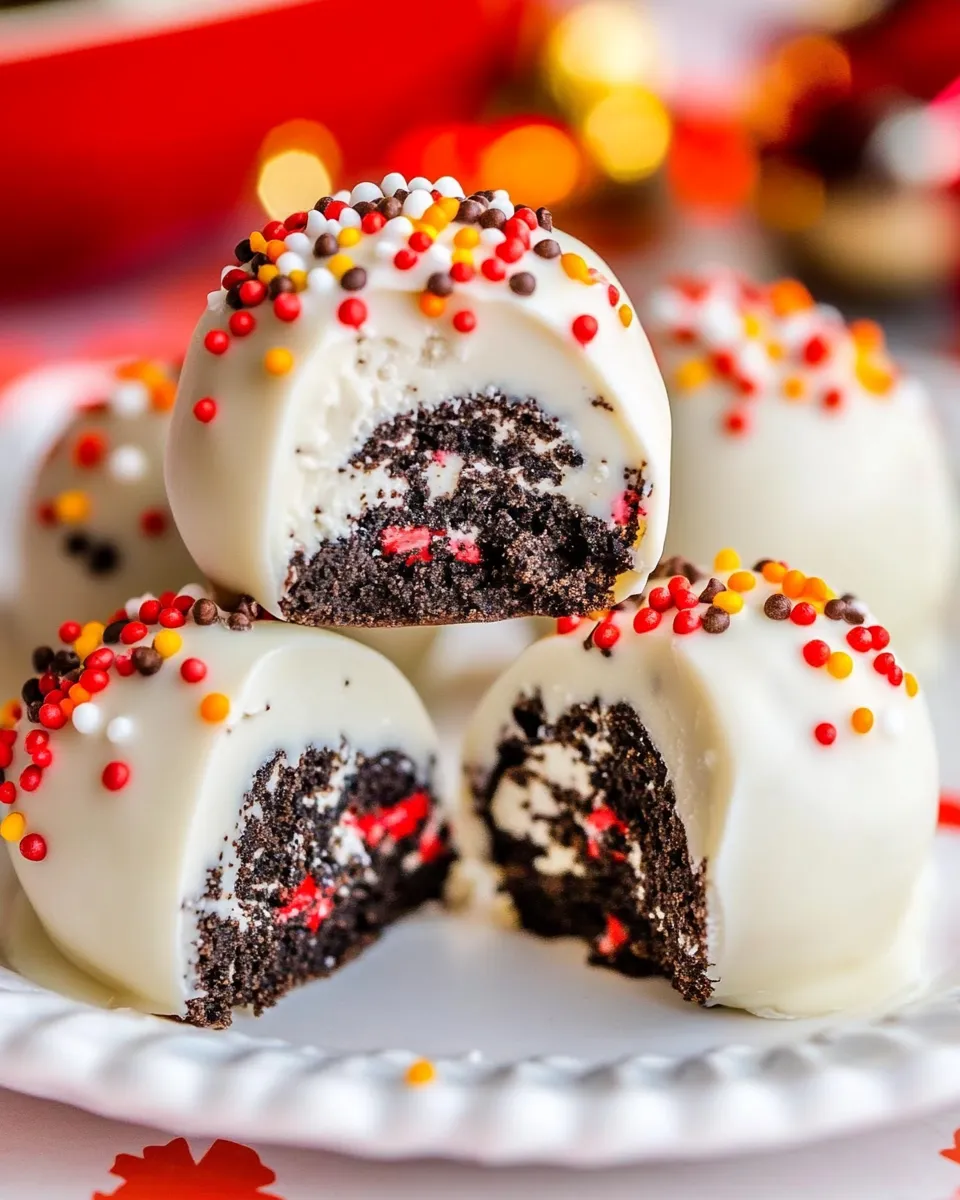
White Chocolate-Dipped Oreo Cookie Balls
Indulging in delectable treats is one of life’s simple pleasures, and what could be more delightful than the combination of creamy white chocolate and crunchy Oreo cookies? These White Chocolate-Dipped Oreo Cookie Balls are not only irresistibly delicious but also incredibly easy to make. Perfect for parties, holidays, or just because, these little bites of joy will have everyone coming back for seconds. Plus, they require minimal ingredients and no baking, making them a go-to recipe for both seasoned bakers and kitchen novices alike.
Reasons to Love White Chocolate-Dipped Oreo Cookie Balls
These delightful treats are more than just a pretty face. Here are a few reasons why you’ll adore them:
- Quick and Easy: With just a handful of ingredients, you can whip up these cookie balls in no time.
- Customizable: Feel free to get creative with toppings, coatings, and flavors.
- Perfect for Any Occasion: Whether it’s a birthday party, holiday gathering, or just a cozy night in, these treats fit right in.
- Crowd-Pleaser: Who doesn’t love Oreos and chocolate? These cookie balls are sure to impress!
- Make Ahead: You can prepare them in advance, making them a convenient treat to have on hand.
Ingredient Rundown
To create your White Chocolate-Dipped Oreo Cookie Balls, you’ll need the following ingredients:
- 36 classic Oreo Cookies: Finely crushed (one 14-ounce package, about 3 cups)
- 8 ounces brick cream cheese: Softened (I recommend full-fat for the creamiest texture)
- 16 ounces white chocolate candy coating: Or white chocolate, melted
- Sprinkles: Optional and as desired, for that extra flair
Before You Start: Equipment
Having the right tools on hand can make your cooking experience smoother. Here’s what you’ll need:
- Mixing Bowl: For combining the crushed Oreos and cream cheese.
- Baking Sheet: To place the cookie balls on while they set.
- Parchment Paper: To line the baking sheet for easy cleanup.
- Double Boiler or Microwave-Safe Bowl: For melting the white chocolate.
- Spoon or Dipping Tool: For dipping the cookie balls into the melted chocolate.
White Chocolate-Dipped Oreo Cookie Balls Made Stepwise

Let’s dive into the step-by-step process of creating your very own White Chocolate-Dipped Oreo Cookie Balls.
Step 1: Crush the Oreos
Start by placing the 36 Oreo cookies in a food processor and pulse until they are finely crushed into a crumb-like texture. If you don’t have a food processor, you can also put them in a zip-top bag and crush them with a rolling pin.
Step 2: Mix with Cream Cheese
In a mixing bowl, combine the crushed Oreos with the softened cream cheese. Use a spatula or your hands to mix until fully combined, and the mixture holds together when pressed.
Step 3: Form the Balls
Using your hands, scoop out a small amount of the mixture and roll it into a ball, about 1 inch in diameter. Place the formed balls onto a baking sheet lined with parchment paper. Repeat until all the mixture is used, making approximately 24-30 cookie balls.
Step 4: Chill the Cookie Balls
Cover the baking sheet with plastic wrap and refrigerate for at least 30 minutes, or until the cookie balls are firm. This helps them hold their shape during the dipping process.
Step 5: Melt the White Chocolate
While the cookie balls are chilling, melt the white chocolate candy coating. You can do this using a double boiler or in the microwave in 30-second intervals, stirring in between until smooth.
Step 6: Dip the Cookie Balls
Once the cookie balls are firm, remove them from the fridge. Using a spoon or dipping tool, dip each ball into the melted white chocolate, ensuring they are fully coated. Allow any excess chocolate to drip off, then return the coated cookie balls to the parchment-lined baking sheet.
Step 7: Add Sprinkles (Optional)
While the white chocolate is still wet, sprinkle your desired toppings on each cookie ball. This is the time to get creative with colors and shapes!
Step 8: Let Set
Allow the cookie balls to sit at room temperature or refrigerate them for about 15-20 minutes, or until the white chocolate is completely set.
Smart Substitutions

If you want to switch things up or accommodate dietary preferences, here are some smart substitutions you can make:
- Gluten-Free Oreos: Use gluten-free Oreo cookies for a gluten-free version.
- Vegan Cream Cheese: Opt for a dairy-free cream cheese alternative if you want a vegan version.
- Dark Chocolate: Swap white chocolate for dark chocolate for a richer flavor.
- Flavored White Chocolate: Consider using flavored white chocolate, like vanilla or peppermint, for a unique twist.
Mistakes Even Pros Make
Even experienced bakers can stumble when making these tasty treats. Here are some common pitfalls to watch out for:
- Not crushing the Oreos finely enough can lead to a crumbly mixture that doesn’t hold together well.
- Using cold cream cheese instead of softened cream cheese can make it difficult to mix.
- Skipping the chilling step might result in cookie balls that lose their shape while being dipped.
- Overheating the white chocolate can cause it to seize, making it unusable for dipping.
Best Ways to Store
To keep your White Chocolate-Dipped Oreo Cookie Balls fresh and delicious, consider the following storage tips:
- Refrigerate the cookie balls in an airtight container for up to 1 week.
- You can also freeze them for up to 3 months. Just ensure they are in a freezer-safe container or bag.
- When ready to enjoy frozen cookie balls, let them sit at room temperature for about 15 minutes before serving.
Ask the Chef
Can I use different kinds of cookies?
Absolutely! While Oreos are a classic choice, feel free to experiment with other cookie varieties like chocolate chip, peanut butter, or even gluten-free cookies.
How can I make these cookie balls more festive?
For a festive touch, you can use colored sprinkles or edible glitter, or even drizzle with melted chocolate in different colors for a fun design.
What if my white chocolate is too thick for dipping?
If your melted white chocolate is too thick, you can thin it out by adding a small amount of coconut oil or vegetable shortening. This will help achieve a smoother consistency.
Can I make these cookie balls ahead of time?
Yes! You can prepare the cookie balls and refrigerate them a day or two in advance. Just wait to dip them in chocolate until you’re ready to serve for the best texture.
Explore More
If you love these White Chocolate-Dipped Oreo Cookie Balls, you might also enjoy these delicious recipes:
Ready to Cook?
Now that you have all the tips and tricks to make your very own White Chocolate-Dipped Oreo Cookie Balls, it’s time to roll up your sleeves and get started! These delightful bites are sure to become a favorite in your household. Enjoy the process, and don’t forget to share your creations with family and friends. Happy baking!

White Chocolate-Dipped Oreo Cookie Balls
Ingredients
Equipment
Method
- Start by placing the 36 Oreo cookies in a food processor and pulse until they are finely crushed into a crumb-like texture. If you don’t have a food processor, you can also put them in a zip-top bag and crush them with a rolling pin.
- In a mixing bowl, combine the crushed Oreos with the softened cream cheese. Use a spatula or your hands to mix until fully combined, and the mixture holds together when pressed.
- Using your hands, scoop out a small amount of the mixture and roll it into a ball, about 1 inch in diameter. Place the formed balls onto a baking sheet lined with parchment paper. Repeat until all the mixture is used, making approximately 24-30 cookie balls.
- Cover the baking sheet with plastic wrap and refrigerate for at least 30 minutes, or until the cookie balls are firm. This helps them hold their shape during the dipping process.
- While the cookie balls are chilling, melt the white chocolate candy coating. You can do this using a double boiler or in the microwave in 30-second intervals, stirring in between until smooth.
- Once the cookie balls are firm, remove them from the fridge. Using a spoon or dipping tool, dip each ball into the melted white chocolate, ensuring they are fully coated. Allow any excess chocolate to drip off, then return the coated cookie balls to the parchment-lined baking sheet.
- While the white chocolate is still wet, sprinkle your desired toppings on each cookie ball. This is the time to get creative with colors and shapes!
- Allow the cookie balls to sit at room temperature or refrigerate them for about 15-20 minutes, or until the white chocolate is completely set.
Notes
- For a gluten-free version, use gluten-free Oreo cookies.
- Opt for a dairy-free cream cheese alternative for a vegan option.
- Consider using flavored white chocolate for a unique twist.